Check the materials match the docket. NOW. Not at 11am when you've already dug 10 holes.
- Right rails, right length, right colour?
- Sleepers if the job needs them, cut to the right length?
- Sheets / palings, enough for the metres?
- Caps, capping, fixings, post caps?
- Concrete bags, water, mixing tools?
Missing something? Message Tom. We make 2-3 daily trips anyway. Snag anything else we might run short on while we're there. Think ahead. No shame in flagging a mistake early. Big shame at 2pm when we're stuck.
End Posts + Concrete
THE LESSON
End posts go in first. Always. End posts anchor the whole run. Get these right and the rest follows. Get them wrong and you'll fight the whole job.
Confirm the fence line.
Walk it with the customer if you haven't already. Mark out where each end post sits with a peg or paint.
If the fence line is unclear. Boundary disputes, no survey pegs, neighbours not home. STOP. Don't guess. Ring me. A fence put up on the wrong line is a fence we'll be ripping out and rebuilding at our cost. Worth a phone call.
Dig the two end-post holes.
Hole depth and width depend on fence height. Standard 247 specs:
- 1.2m fence: 600mm deep, 200mm wide
- 1.5m fence: 600mm deep, 200mm wide
- 1.8m fence: 600mm deep, 200mm wide
- 2.1m and over: 700mm minimum, 200mm wide
- Gate posts: 600-800mm, 200mm wide
Cylinder holes only. 200mm diameter. Auger if you can, hand-dug if you can't.
Plumb both end posts. Set in concrete.
Rapid set bag plus water plus pack. The full method is in the next lesson.
Why the end posts FIRST?
Once both end posts are set, you've got two solid points to run string lines between. The whole job runs off these two posts. They're the anchors. Without them set in concrete, you've got nothing to reference.
You arrive at the fence line and the customer hasn't pointed out where it actually goes. The neighbours aren't home. There are no survey pegs. What's the right move?
- A) Pick the most obvious line and start digging
- B) Use the old fence line as a reference
- C) Stop. Ring Tommy. Don't guess on boundary.
- D) Ask the customer's kids where the line is
Reveal answer ↓
Answer: C
A fence on the wrong line is a fence we'll be ripping out at our cost. Maybe legal action from the neighbour. Worth a phone call. Don't guess on boundaries. Ever.
Standard 247 hole depth for a 1.8m fence?
- A) 400mm
- B) 500mm
- C) 600mm
- D) 800mm
Reveal answer ↓
Answer: C
600mm deep, 200mm wide cylinder. Same depth from 1.2m up to 1.8m fences. 2.1m and over jumps to 700mm minimum.
Why do you think end posts go in FIRST, before any string lines? Write a sentence in your own words.
Concrete the Posts (Rapid Set)
THE LESSON
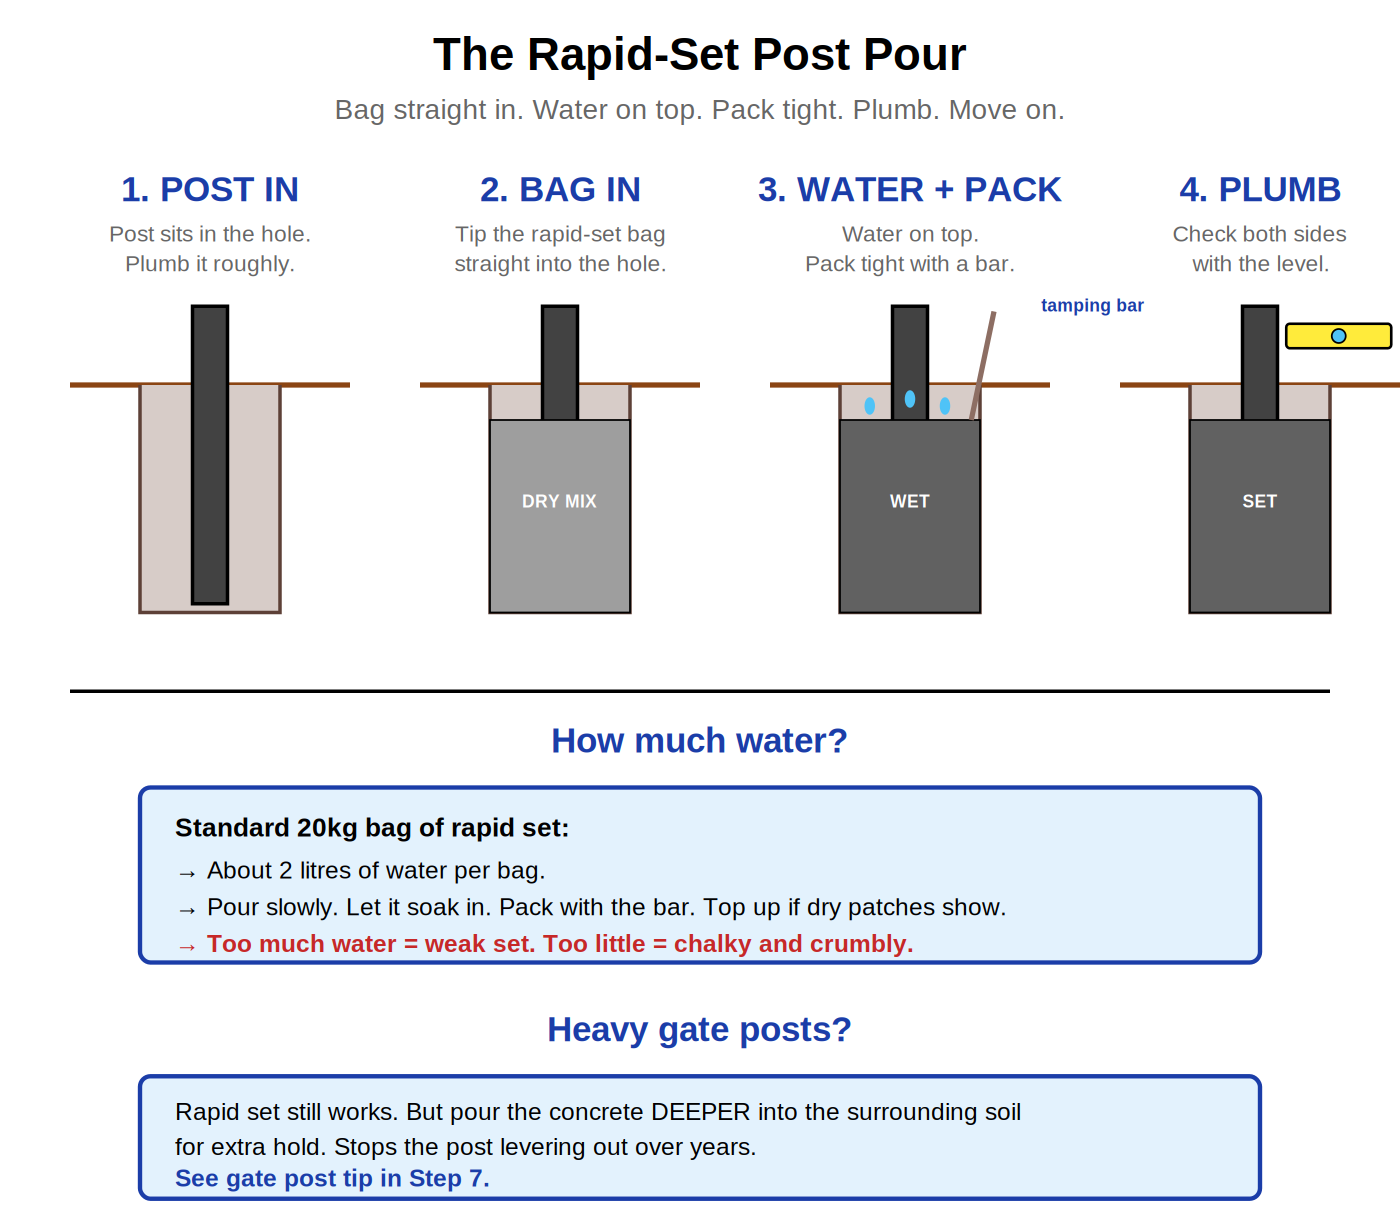
Rapid set is our standard concrete for fence posts. Done right, you can dig, set, and move on in 20 minutes. Done wrong, the post is loose in 6 months and we're back fixing it.
The 5 steps. In order.
1. Post in. Plumb it roughly.
Stand the post in the hole. Hold it plumb by eye. Doesn't have to be perfect yet. We'll fine-tune after the concrete goes in.
2. Bag in. Dry mix straight into the hole.
Tip the bag in. Don't pre-mix in a bucket. We mix it in the hole. Rapid set is designed for this. Mixing in the hole saves you a step and a bucket to clean.
Pack it hard with crowbars. Drops the water down, pushes the air out, sets the post in position. Post should be sitting 1-2mm off the string line or just kissing it. Don't push 3mm hard into the string at every post. That's how you get a curved fence. Just barely kissing it.
Packing Posts: Crowbar + Water
Video not playing? Watch it on Vimeo →
Watch how to pack the post properly. Crowbar drops the water down through the rapid set, pushes air out, locks the post in position. Just kissing the string.
3. Water on top. About 2 litres per 20kg bag.
Pour slowly. Let it soak in. Don't drown it.
Too much water equals weak set. Too little water equals chalky, crumbly. The sweet spot is 2L per bag. Top up if you see dry patches.
4. Pack with a bar. Plumb on both sides.
Tamp the concrete tight with a digging bar. This pushes the mix down into the gaps around the post.
Then check plumb both ways with the level. Both ways. Front-to-back AND side-to-side. Fix it now while the concrete is still wet.
5. Move on. Sets in 15-20 mins.
Don't sit there watching it. Don't keep checking. Crack on with the next post. By the time you're back, this one's set.
Don't bump the post for 20 minutes after setting. That's the rule. A bump while it's curing means a wonky post forever.
Heavy gate posts?
Rapid set still works. But pour the concrete DEEPER into the surrounding soil for extra hold. Stops the post levering out over years from the gate's weight. We'll cover this more in the gates lesson.
You're concreting a fence post. How much water per 20kg bag of rapid set?
- A) 500ml
- B) 1 litre
- C) 2 litres
- D) 5 litres
Reveal answer ↓
Answer: C
2 litres per 20kg bag. Pour slowly. Too much water = weak set (won't cure properly). Too little = chalky and crumbly (won't bind). 2L is the sweet spot. Top up if you see dry patches.
The post is in concrete. You bump it accidentally 10 minutes after setting. What happens?
- A) Nothing, it's fine
- B) The post is now permanently wonky
- C) You can just push it back into place
- D) Concrete strength is unaffected
Reveal answer ↓
Answer: B
Once rapid set starts curing, any bump knocks it out of plumb forever. The post will set in the new (wrong) position. 20 minutes minimum, no bumps. Plan your work so you're not stepping near a freshly-set post.
Most fencers stand around watching concrete set. The 247 way is to mix it in the hole and move on. How much time do you reckon this saves per post?
Bottom String Line (Find Transitions)
THE LESSON
End posts are in. Concrete is curing. Now we run the bottom string line.
The bottom string does two jobs. It gives us the bottom rail height. Where the bottom of the fence sits all the way along. And it shows us the transitions. Where the ground changes height.
Tie tight at one end post.
About 50mm above ground level. Tight as a guitar string.
Walk to the other end post. Tie off tight.
Both ends at the same height off the ground.
Walk the line. Look for transitions.
This is the bit most fencers skip. Walk the string slowly. Look at where it sits relative to the ground:
- Ground steps UP under the line = paling will be shorter here. Not a problem.
- Ground drops AWAY from the line = sleeper zone. We need to retain.
- Ground hits the line = the line is too low, lift it 50mm.
Mark every transition with a stake or paint. Don't try to remember them. By post 12 you'll have forgotten about post 3.
Why this matters.
Transitions are where mistakes happen. If you don't spot a sleeper zone now, you'll find out about it when you're trying to install rails and there's a 200mm gap to the ground. Then you're improvising in the middle of the day, which means slower work and a worse result.
Spot transitions in 10 minutes of walking. Plan the fix into the install. Move on.
Important: the bottom string comes OFF before we dig the middle post.
Don't worry about that yet. Next few lessons cover it. For now, just know that the bottom string is up to find transitions. Then it'll come down again. Then it'll go back up between THREE posts. There's a reason for the sequence. We'll get there.
You're running the bottom string line and the ground starts to drop away from the line halfway along. What does this tell you?
- A) The string is too high. Lift it
- B) Sleeper zone. We need to retain here
- C) The string is too low. Drop it
- D) The ground isn't level. Pick a different line
Reveal answer ↓
Answer: B
Ground dropping away from the string line means a sleeper zone. We'll need a sleeper between those posts to retain the ground and stop a gap under the fence. Mark it now, plan it in. Surprises mid-install slow the whole day down.
You spot 4 transitions during the bottom string walk. What do you do?
- A) Try to remember them all
- B) Tell the crew verbally
- C) Mark every transition with a stake or paint
- D) Just remember the most important one
Reveal answer ↓
Answer: C
Mark every transition. Don't try to remember. By post 12 you'll have forgotten about post 3. A stake or paint mark on the ground is foolproof. Five seconds to mark, saves the wrong call later.
Think about the last fence you ran a string line on. How thoroughly did you walk it? Did you spot transitions, or did you find them mid-install?
Caterpillar Set-Out
The Caterpillar / LeapFrog Set-Out
Video not playing? Watch it on Vimeo →
Watch Tommy walk through the caterpillar set-out. 2 rails. 10mm gap between leapfrogs. The rail is the tape measure.
THE LESSON
Bottom string line is up. Transitions are marked. Now we set out the post centres.
Most crews use a tape measure. Roll it out, mark every 2.4m, dig there. Slow. Easy to misread. Easy to drift off line.
We don't measure. The rail IS the tape measure.
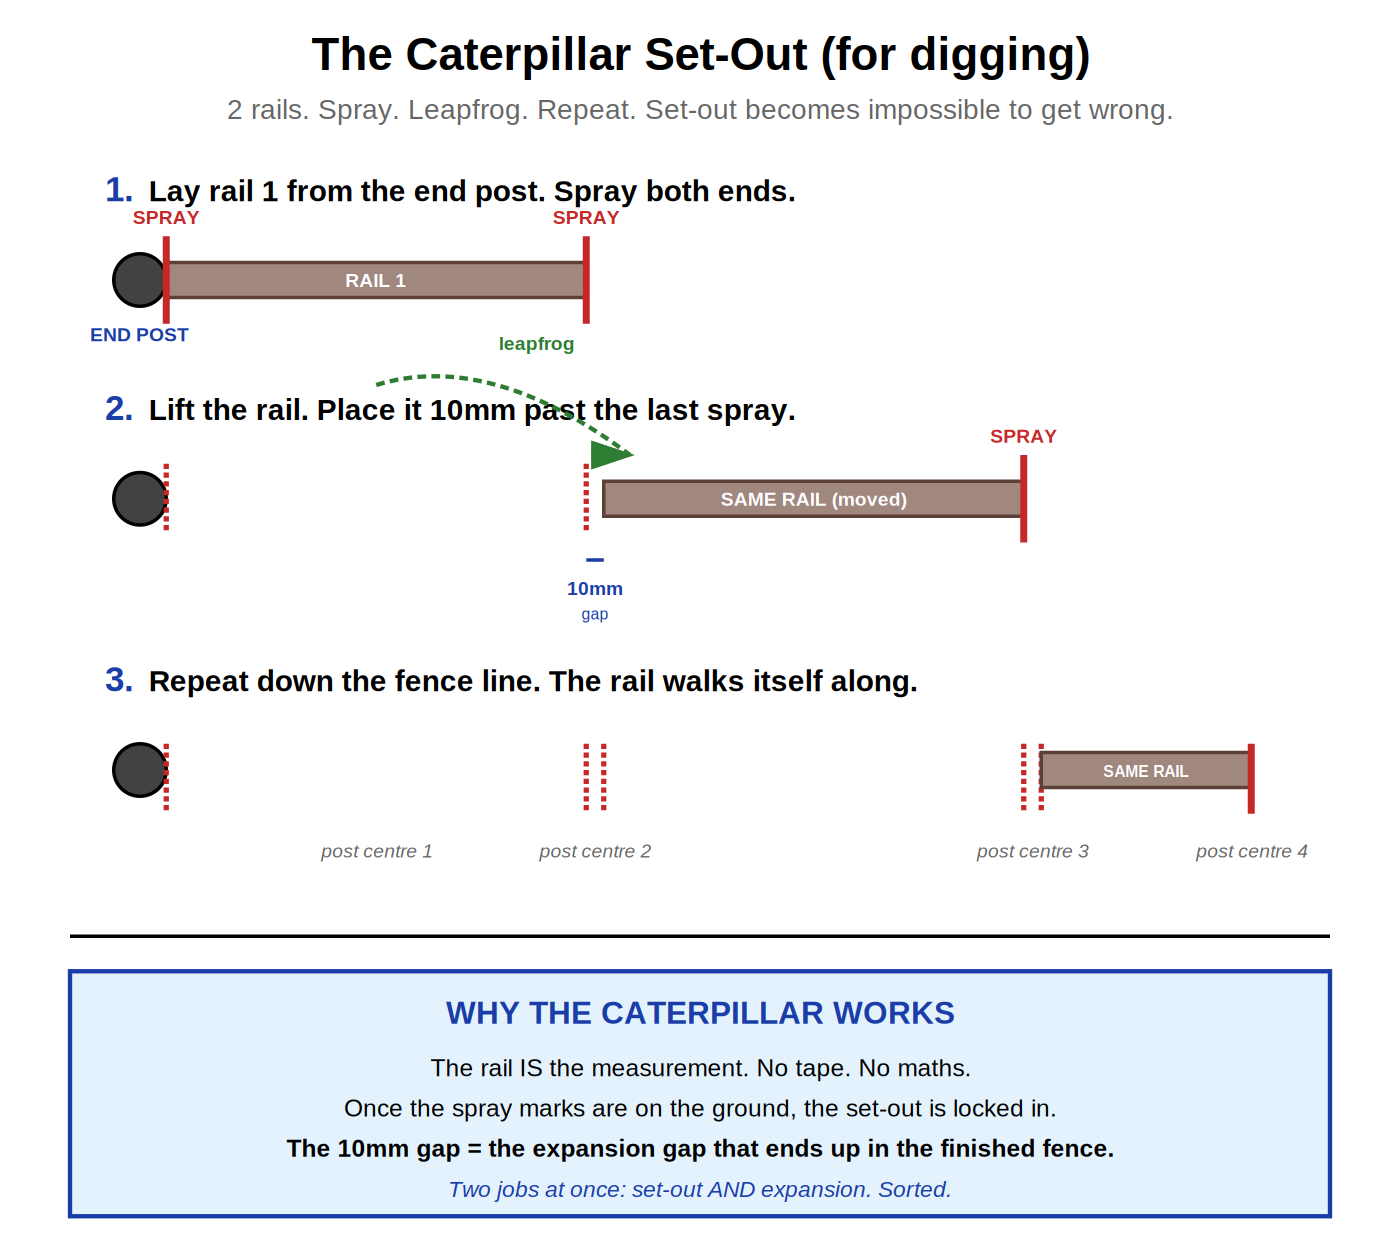
Grab 2 rails. Start at the end post.
Boys call it the Caterpillar. Boys call it the LeapFrog. Whatever name you use, it's the same trick.
Lay rail 1 flat on the ground, against the end post. Spray a line at the far end of the rail.
Spray BETWEEN as well.
Mark both ends of the rail with spray. That's the next post centre.
Lift the rail. Leapfrog it 10mm past the last spray.
10mm gap between where rail 1 finished and where it now starts. Spray the new far end. Lay a good 400-500mm spray line on the ground so you can still see it after digging starts. Don't spray it on finished surfaces though, that's permanent.
That 10mm gap matters. It's the expansion gap that ends up in the finished fence. We're doing two jobs at once. Setting out posts AND building in the expansion gap.
Repeat down the fence line.
The rail walks itself along. The spray marks become your dig points.
Once the spray is on the ground, you CAN'T get the set-out wrong. The rail did the math for you.
Rail length depends on the supplier. Check the docket.
- Oxworks Colorbond: 2410mm
- Ourtown Colorbond: 2370mm
- Timber (typical): 2390mm. For timber we mark 2390 on the rail, then 4780mm (double), and we spray each mark on the ground.
CHECK the docket. Suppliers change. Rail lengths change. Don't assume.
Note on stock vs working lengths: Stock comes off the truck at 2400 (Oxworks) and 2365 (Ourtown). The 10mm gap each side is your fitting tolerance baked into the working measurement. Work to 2410 and 2370. Cut sleepers off the working length, not the stock length.
During caterpillar set-out, what's the gap between where Rail 1 finishes and where it leapfrogs to?
- A) Touching, no gap
- B) 5mm
- C) 10mm
- D) 20mm
Reveal answer ↓
Answer: C
10mm gap every time. That 10mm is the expansion gap that ends up in the finished fence. Two jobs at once. Setting out posts AND building in the expansion gap. No measuring needed.
You've got Oxworks Colorbond rails on this job. What length should they be?
- A) 2370mm
- B) 2390mm
- C) 2410mm
- D) Always 2400mm
Reveal answer ↓
Answer: C
Oxworks 2410mm. Ourtown 2370mm. Timber typical 2390mm. Different suppliers, different lengths. Always check the docket. Don't assume one length fits all.
The caterpillar method is faster AND more accurate than measuring every post. No tape. No marking up. No maths. Lay it. Spray it. Lift it. Leapfrog 10mm. Repeat.
This is the kind of process improvement Musk's 5-step method is built for. We questioned the standard "measure every post" approach. We cut the rubbish (the tape measure step). We simplified what's left. We sped it up. We don't need a better tool. We don't even need the tape.
The caterpillar method removes a step (the tape measure) that most crews think is essential. What other "essential" step on a job do you think might actually be rubbish that could be cut?
Dodge the Old Post Holes
THE LESSON
This lesson is for STRIP-OUTS only. Brand new fence on virgin ground? Skip this lesson.
If we're replacing an old fence, the old footings are still in the ground. We learned in Chapter 2 (Lesson 2.4) to cut the old footings flush 50mm below ground level. They're still down there, doing nothing. Concrete blocks of nothing.
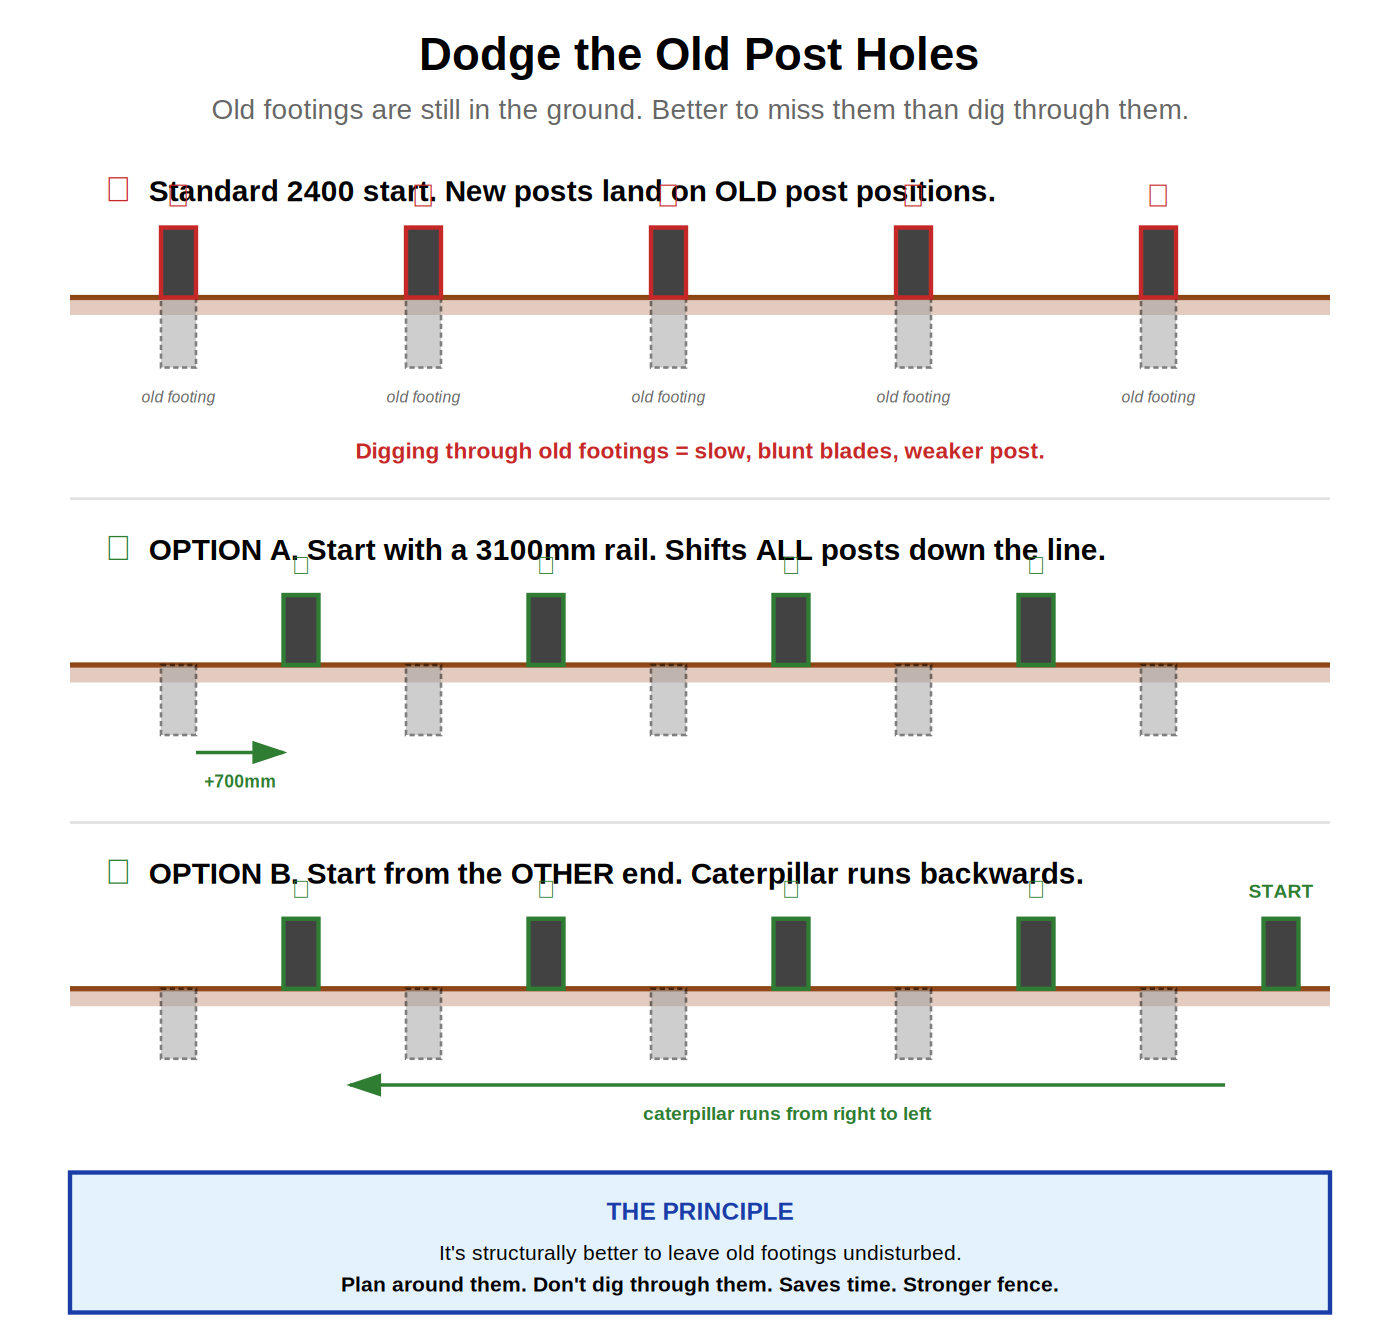
But if we set out new posts in the SAME spots, we're trying to dig new holes through old concrete. Slow. Wrecks blades. Weakens the new post's hold. Better to plan around them than dig through.
Walk the line. Spot the old post positions.
Look at where the old posts WERE. The dirt around them might be looser. There might be marks where the post met the ground. Use the spray marks from your caterpillar set-out. Are they landing on old post positions?
If YES, we've got two options.
Option A. Start from the OTHER end.
The old fence started at one end. We start from the other. Caterpillar runs backwards. Post centres land in different spots. New posts dodge the old footings. This is the go-to first option.
Option B. Shift the start point.
Move the first post centre over 700mm or so. Caterpillar runs the same way, just offset. All centres now land in clean ground.
Option C. The 3100mm rail trick.
Worst case, grab a 3100mm rail for the first run instead of a standard 2410 (or 2370 or 2390). Shifts ALL post centres 700mm down the line. Save this one for hidden surprises. Old footings you didn't see until you started digging.
Why this matters structurally.
Two reasons we want to leave old footings undisturbed:
- Old concrete is hard. Digging through it is slow and breaks augers.
- The ground AROUND an old footing has been compacted for years. Disturbing it weakens the new post's hold. New post in clean undisturbed ground equals stronger fence.
Plan around the old footings. Don't dig through them.
Your caterpillar set-out spray marks are landing right on the old post positions. What's the right move?
- A) Dig through the old footings, they're not that hard
- B) Start from the other end, or shift the start, or worst case use a 3100mm starting rail
- C) Skip those posts
- D) Reduce the number of posts
Reveal answer ↓
Answer: B
Three options to dodge. Option A: start from the opposite end (default move). Option B: shift the start by 700mm. Option C: 3100mm starting rail (save this for hidden surprises). Either way, new posts land in clean undisturbed ground. Stronger fence. Faster dig.
Why is it structurally better to leave old footings in the ground rather than digging them out?
- A) Saves us money on disposal
- B) The compacted ground around old footings stays undisturbed, making new posts stronger
- C) Council requires it
- D) It's just easier
Reveal answer ↓
Answer: B
Ground around an old footing has been compacted for years. Undisturbed, dense, stable. New post nearby in clean undisturbed ground holds way better than a new post in re-dug, re-filled, recently-disturbed soil.
On a strip-out, what's easier in the moment. Digging through an old footing or running the caterpillar from the other end? Which one makes the fence stronger?
Middle Post First
THE LESSON
Here's where the 247 install order surprises most fencers. We dig the MIDDLE post BEFORE the intermediate posts. Or if there are 3-4 transitions, we dig at the peak of each change of direction in the ground.
Most crews go: end posts → bottom string → top string → dig all the intermediate posts in order from one end to the other.
We go: end posts → bottom string (find transitions) → caterpillar set-out → bottom string OFF → MIDDLE post → both strings up between 3 posts → eye-trick → intermediate posts.
The middle post matters because of one physics problem: string lines sag.
Take the bottom string OFF first.
We had it up to find transitions. Now it comes down so we can dig the middle post without fighting it.
This feels backwards (we just put it up!) but trust the order. We'll put both strings back up in a minute. With the middle post in, they won't sag.
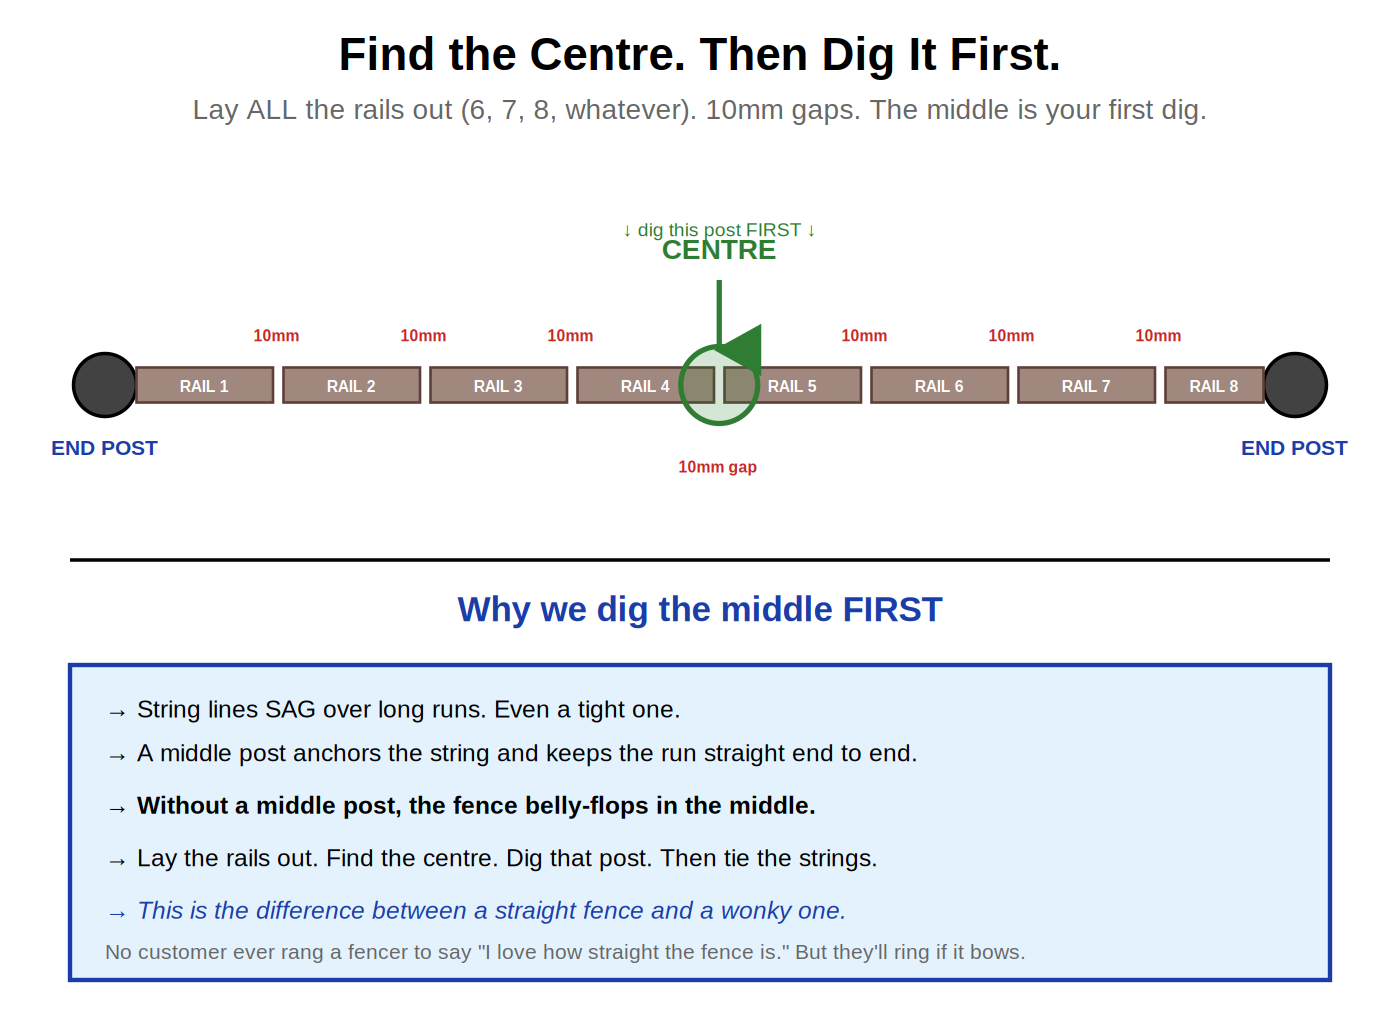
Find the centre. Use the full caterpillar.
Lay ALL the rails out end-to-end with 10mm gaps. The centre of that full caterpillar is where the middle post goes.
Tape measures lie. Rails don't. The middle of the caterpillar IS the middle of the run, by definition.
Dig the middle post. Concrete. Plumb left-right.
Same depth and method as the end posts. Same rapid set bag + water + pack.
Why this matters.
String lines sag over long runs. Even tight ones. Pull a string between two posts 20 metres apart, even pulled tight as a guitar string, it droops in the middle. Maybe 10mm. Maybe 30mm. Get someone to eye the line for you, or eye it yourself after. Where you tie off matters too. Top of the screw or bottom of the screw can be 5mm different. That little 5mm can make the line dead straight.
A middle post anchors the strings so they can't sag.
Without it, the fence belly-flops in the middle. The whole line is wrong by the time you reach the other end.
WITH the middle post, the strings stay dead straight. The whole run is true.
How do you find where the middle post should go?
- A) Eyeball it. The middle of the run
- B) Measure with a tape
- C) Lay all the rails out end-to-end with 10mm gaps and find the centre of the caterpillar
- D) Halfway between the end posts on the bottom string line
Reveal answer ↓
Answer: C
The middle of the FULL CATERPILLAR is the middle of the run, by definition. Tape measures lie. Rails don't. Lay them all out, find the centre, dig there. Same method that gave us the post set-out in Lesson 3.4.
Why dig the middle post BEFORE running both strings?
- A) It's easier to dig without strings in the way
- B) The middle post anchors the strings so they can't sag. Fence stays straight
- C) Tradition
- D) It looks better
Reveal answer ↓
Answer: B
String lines sag in the middle, even when pulled tight. Without a middle post to anchor them, the fence follows the sag and belly-flops in the middle. The middle post fixes this. Both strings tie off at the middle post at the correct (no-sag) height. Fence stays dead straight.
The 247 install order goes against what most fencers learn (strings first, posts after). What's the hardest part of this sequence to remember? Why?
The Eye-Trick + Tie Off
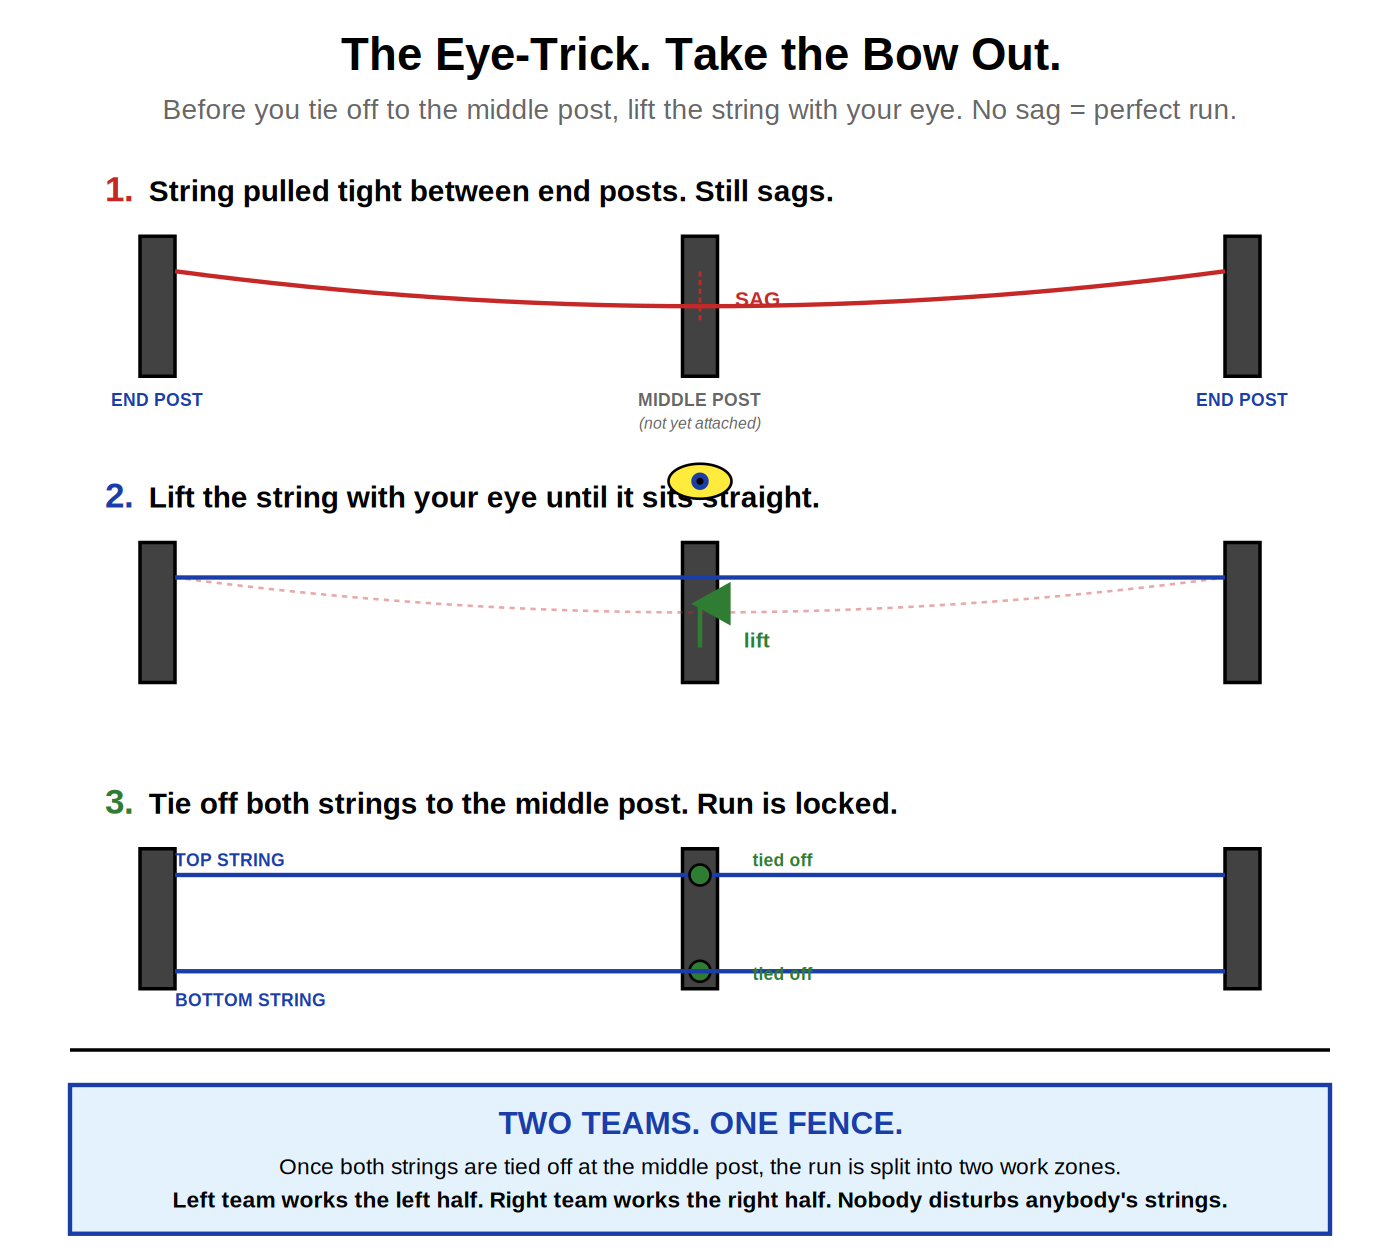
The Eye-Trick: Sag and Transitions
Video not playing? Watch it on Vimeo →
Watch Tommy lift the string with his eye to the no-sag height. Tie at THAT height on the middle post. Fence stays dead straight end to end.
THE LESSON
You've got three posts in the ground now. Two end posts and a middle post. Time to put both strings back up.
But here's the trick most fencers stuff up.
A tight string still sags. Doesn't matter how hard you pull it. Gravity wins. Pull a string between two posts 20 metres apart, even pulled tight as a guitar string, it'll droop in the middle. Maybe 10mm. Maybe 30mm. Either way. If you tie it off at the middle post where it's sagging, your fence will follow that sag.
The eye-trick fixes it in 5 seconds.
How it works.
- Bottom string up between end posts. Tight. Don't tie to the middle post yet.
- Top string up between end posts. Same deal.
- Stand back. Look down the bottom string. You'll see the sag in the middle.
- Lift the string with your eye. Imagine where it SHOULD sit if there was no sag. That's the line your fence will follow.
- Tie off at the middle post at that "no-sag" height.
- Repeat for the top string.
That's it. Strings can't sag now. The middle post anchors them at the correct, straight height.
One thing to watch. Don't pull the strings so tight they bend the end posts out of plumb. Best to concrete and screw end posts to a junction or fixed point first. Or put a screw at the right height on the end post, run the string to touch it, then anchor the far end to a nail or screw on another fence, a fixed post, anywhere solid. That way the tension's against something fixed, not against your nice new end post.
Why this matters.
Without the eye-trick, your fence belly-flops in the middle. Customer rings two weeks later complaining about a wobbly fence line. That's a callback. That's a Saturday.
With the eye-trick, the fence is dead straight end to end. Customer doesn't know what we did. But they'll know what they see. A perfectly straight fence.
You've got both strings up. Bottom string is sagging 15mm in the middle. Where do you tie it off at the middle post?
- A) At the height the string is currently sagging to
- B) 15mm above where it's sagging (lifted with your eye to take the sag out)
- C) Pull the string tighter first, then tie at whatever height
- D) Doesn't matter, the rail will straighten it
Reveal answer ↓
Answer: B
Pulling tighter doesn't remove sag. Gravity wins no matter how tight. The eye-trick is about lifting the string mentally to where it SHOULD sit if there was no gravity, then tying off at that height. That's the height the rails follow. That's a straight fence.
Once both strings are tied off at the middle post, what becomes possible that wasn't before?
- A) The fence is now finished
- B) The strings can come down
- C) Two teams can work the fence in parallel. Left half and right half independently
- D) The middle post can be removed
Reveal answer ↓
Answer: C
Middle post + tied strings = the run is now split into two work zones. Left team works left half. Right team works right half. Nobody disturbs anybody's strings. Doubles the install pace.
Once both strings are tied off at the middle post, something powerful happens. The run is now split into two work zones.
- Left team works the left half (end post to middle post)
- Right team works the right half (middle post to end post)
- Neither team disturbs the other team's strings
- Install pace doubles
That's why we dig the middle post first. Not just to stop the sag. To enable two-team work.
On your next install, how will you apply the eye-trick differently to how you've done it before?
Intermediate Posts
THE LESSON
End posts. Middle post. Both strings up and tied off at all three. Now we dig the rest.
Work outwards from the middle in both directions.
Two teams, two halves, working in parallel. Left team starts at the middle post and works left. Right team starts at the middle post and works right. They'll never meet (each end is already done).
This is the productivity unlock from the middle post. Use it.
Hole depth depends on fence height. Same standards from Lesson 3.1:
- 1.2m fence: 600mm deep, 200mm wide
- 1.5m fence: 600mm deep, 200mm wide
- 1.8m fence: 600mm deep, 200mm wide
- 2.1m and over: 700mm minimum, 200mm wide
- Gate posts: 600-800mm, 200mm wide
Cylinder holes only. 200mm diameter. Auger if you can, hand-dug if you can't.
Gate post tip: dig the hole 100-200mm deeper than a normal post. Gate posts take a lot more load over time, especially heavy gates. Extra depth means extra hold.
Plumb every post LEFT-RIGHT only.
Plumb across the width of the fence. The string line handles the in-line direction.
Why? Because the string line tells you the in-line position. The level tells you the left-right.
Two different jobs. Two different tools. Don't mix them up.
If you try to plumb posts BOTH ways, you'll fight the string line. The post wants to lean toward where you're pushing with the level. Just plumb across the fence (left-right). Trust the string to handle the line direction.
Posts BETWEEN string lines, not on them.
Don't push the string out with the post. The string is your reference, not a contact point.
If you push the string with each post you set, the line bows out. By the end of the run, your posts won't be straight. The posts sit close to the string but never touch it.
Rapid set. Pack. Move on.
Same method as Lesson 3.2. Don't sit watching it set. Crack on with the next post.
You've got end posts + middle post in. Two teams are starting on the intermediate posts. Which way do they work?
- A) Both teams start at one end and work to the other
- B) Left team starts at the middle post and works left. Right team starts at middle and works right.
- C) Both teams meet in the middle
- D) One team digs, the other team concretes
Reveal answer ↓
Answer: B
Two teams working outwards from the middle = doubled install pace. Left team handles left half. Right team handles right half. They'll never meet (the end posts are already done). Use the productivity unlock the middle post gave you.
You're plumbing an intermediate post. Which direction(s) do you plumb with the level?
- A) Both directions (left-right AND front-back)
- B) LEFT-RIGHT only. The string handles the line direction
- C) FRONT-BACK only
- D) Diagonally
Reveal answer ↓
Answer: B
Plumb LEFT-RIGHT only (across the fence line). The string line tells you the in-line position. The level tells you left-right. Two jobs, two tools. Trying to plumb both ways means you fight the string. Don't mix them up.
You're setting an intermediate post and you notice you've pushed the string line out by 10mm to fit the post. What's wrong?
- A) Nothing. 10mm is fine
- B) The string should be your reference, not a contact point. Posts go BETWEEN the strings.
- C) The string is too tight
- D) Use a thicker post
Reveal answer ↓
Answer: B
Push the string with every post and the line bows out. By the end of the run, your posts aren't straight anymore. Posts sit close to the string but never touch it. The string is reference, not contact.
Plumb LEFT-RIGHT only. Trust the string for the line direction. This is the opposite of what most fencers do. Why is it actually faster AND more accurate?
Sleepers (Colorbond vs Timber)
THE LESSON
All posts are in. Time for sleepers. Sleepers sit between every pair of posts as the kickboard. No gaps under the fence. Sleepers go in BEFORE the rails.
Two systems. Don't mix them up.
The cut and the install method are different depending on the fence type.
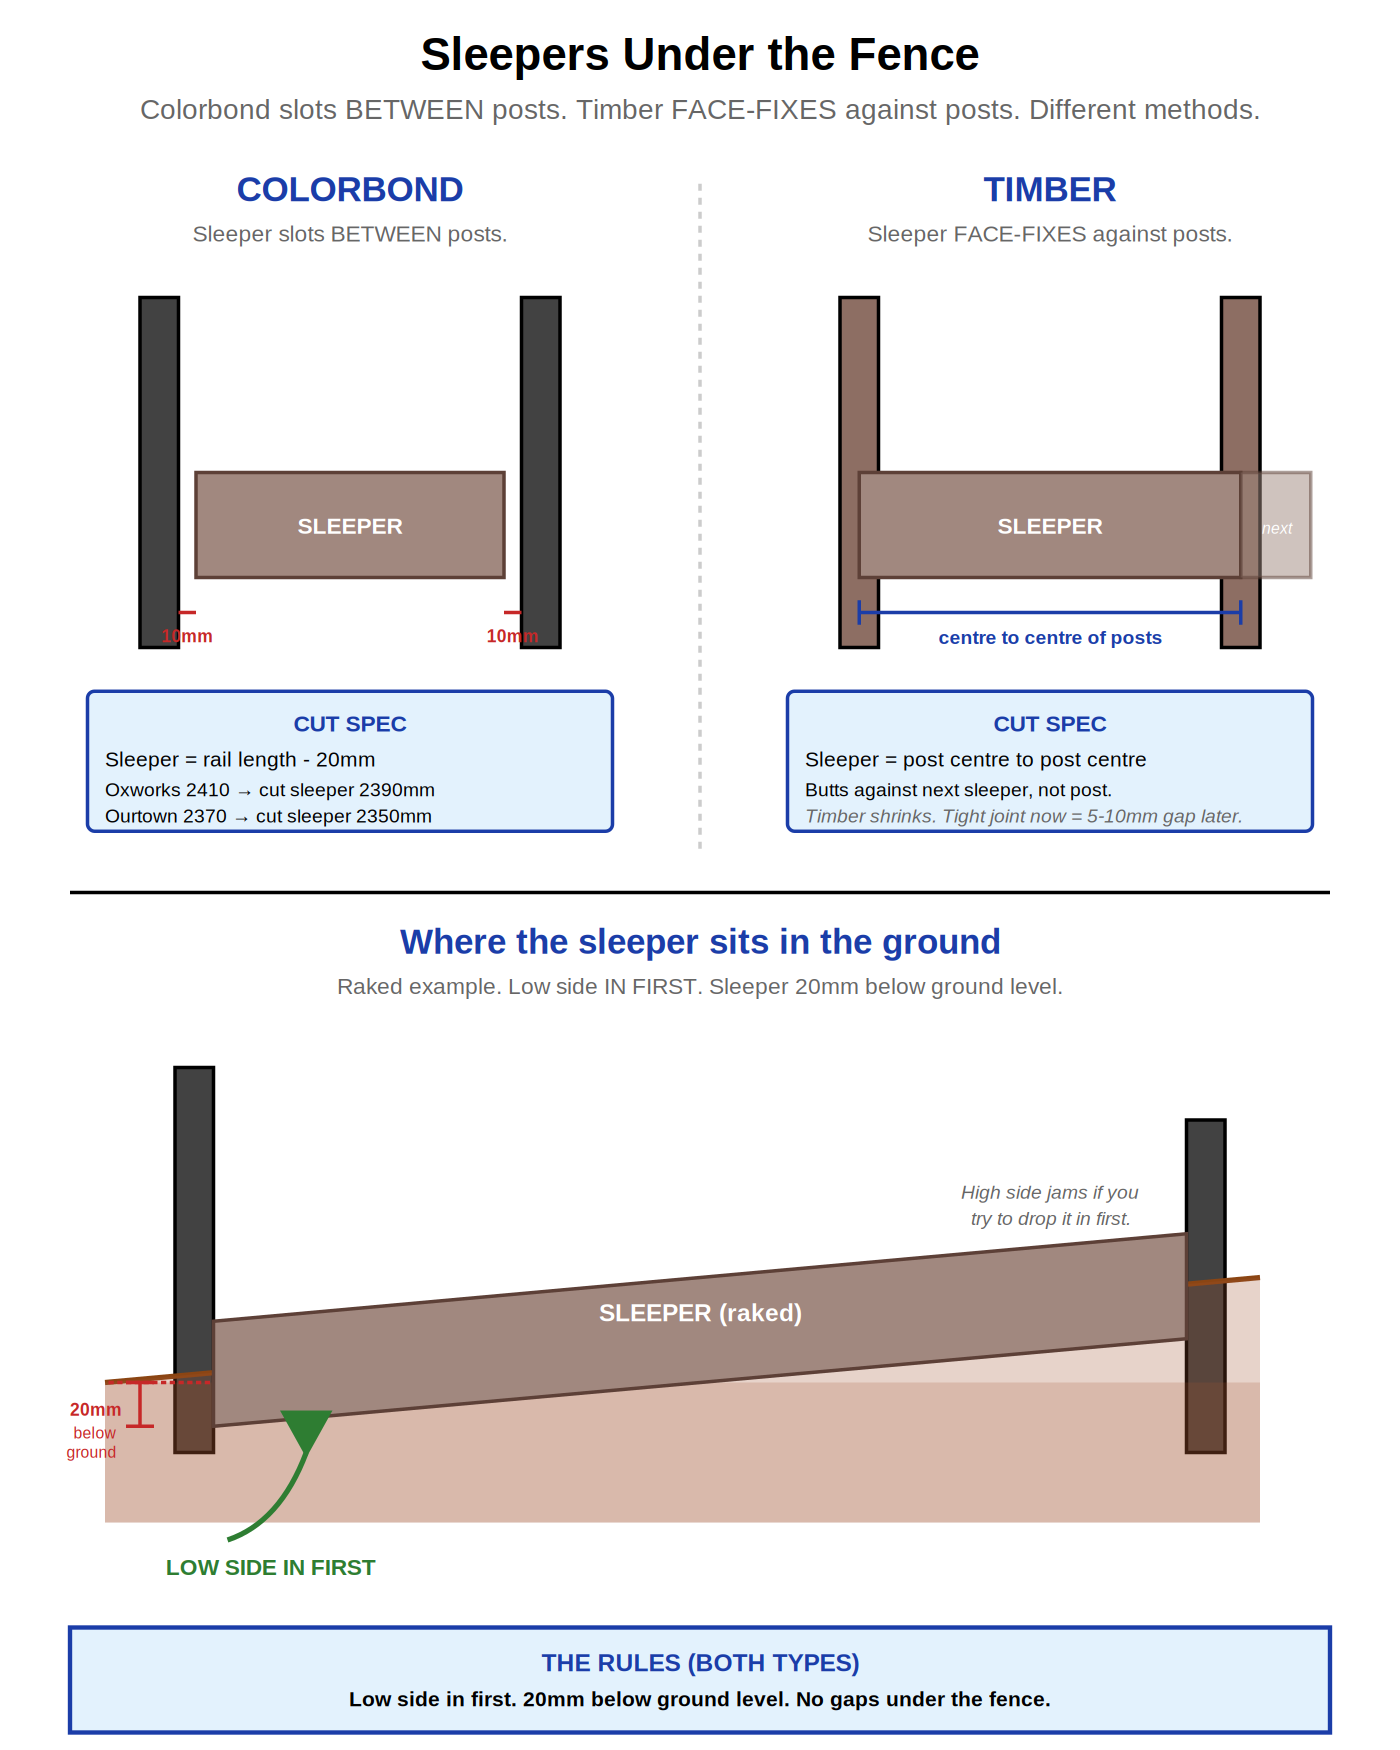
COLORBOND fences. Sleeper slots BETWEEN posts.
- Sleeper length = rail length MINUS 20mm
- Oxworks rail 2410mm → cut sleeper to 2390mm
- Ourtown rail 2370mm → cut sleeper to 2350mm
- The 20mm gap is 10mm play either side. Sleeper drops in clean.
The sleeper sits between the two post faces, with a tiny bit of play either side so it can drop in.
TIMBER fences. Sleeper FACE-FIXES against posts.
- Sleeper length = post centre to post centre. Cut exactly to that length.
- Sleeper butts against the NEXT sleeper, not the post.
- Raked timber: SCRIBE-CUT the ends so the sleeper face sits PLUMB against the post.
Different system entirely. The sleeper doesn't slot between posts. It face-fixes against them. The post face is what the sleeper attaches to.
Why timber butts against the next sleeper, not the post.
Timber shrinks over months. A tight butt joint now becomes a 5-10mm gap in 3-6 months. That's normal. Don't try to caulk it or jam them tighter. If a customer rings about the gap, explain it's natural timber movement. The fence is still doing its job.
Drop the sleeper in. LOW side first if raked.
On a sloped run, the low side goes in FIRST. Then lever the high side in.
Try to drop the high side in first and the sleeper jams against the next post. Low side in, then pivot the high side down. Slides in clean every time.
Sleeper sits 180mm ABOVE ground level. 20mm BELOW.
Top of sleeper is 180mm above the dirt line. Bottom is 20mm below. Total exposed height around 180mm above ground, with the 20mm tucked under to seal off the bottom.
Why the 20mm below? Stops mice, dogs, and kids' toys getting under the fence. Also locks the sleeper in place so it can't be kicked out from underneath.
Sometimes a second sleeper on top.
If the customer wants a taller base (extra retention, hide a slope), stack a second sleeper above the first.
Two-high sleeper bases are charged EXTRA. Make sure the quote covers it before you stack a second one.
You've got Ourtown Colorbond rails (2370mm). What length do you cut the sleeper?
- A) 2370mm
- B) 2390mm
- C) 2350mm
- D) Post centre to post centre
Reveal answer ↓
Answer: C
Colorbond sleeper = rail length minus 20mm. 2370 - 20 = 2350mm. That 20mm = 10mm play either side so the sleeper drops in clean between the posts. Different rule entirely for timber.
You're installing a sleeper on a raked timber fence. Which side goes in first?
- A) Whichever's easier
- B) The high side
- C) The LOW side. Then lever the high side in.
- D) Both at once
Reveal answer ↓
Answer: C
Low side in first. Then pivot the high side down. Slides in clean every time. Try the high side first and the sleeper jams against the next post. Same rule for Colorbond AND timber on a rake.
Customer rings 4 months after job: "There's a 5mm gap between two of the timber sleepers!" What's the right response?
- A) Come back and re-do them
- B) Caulk the gaps
- C) Explain it's natural timber movement. The fence is still doing its job
- D) Replace those sleepers under warranty
Reveal answer ↓
Answer: C
Timber shrinks over months. A tight butt joint becomes a 5-10mm gap in 3-6 months. Expected behaviour. The fence is still doing its job. The sleeper is still keeping things out, the fence is still solid. Explaining this calmly is better than trying to fix something that isn't broken.
Colorbond sleepers slot BETWEEN posts. Timber sleepers face-fix AGAINST posts. Why do you think the two systems are different? What's the trade-off?
Rails (Positioning + LHS-Only Screws)
THE LESSON
Posts are all in. Sleepers are in. Time for rails.
Two big things to learn in this lesson. Rail positioning (the measurements). And the LHS-only screwing technique (the trick that makes sheeting fast).
Rail positioning. Mark BEFORE you screw anything.
Different rules for Colorbond and Timber.
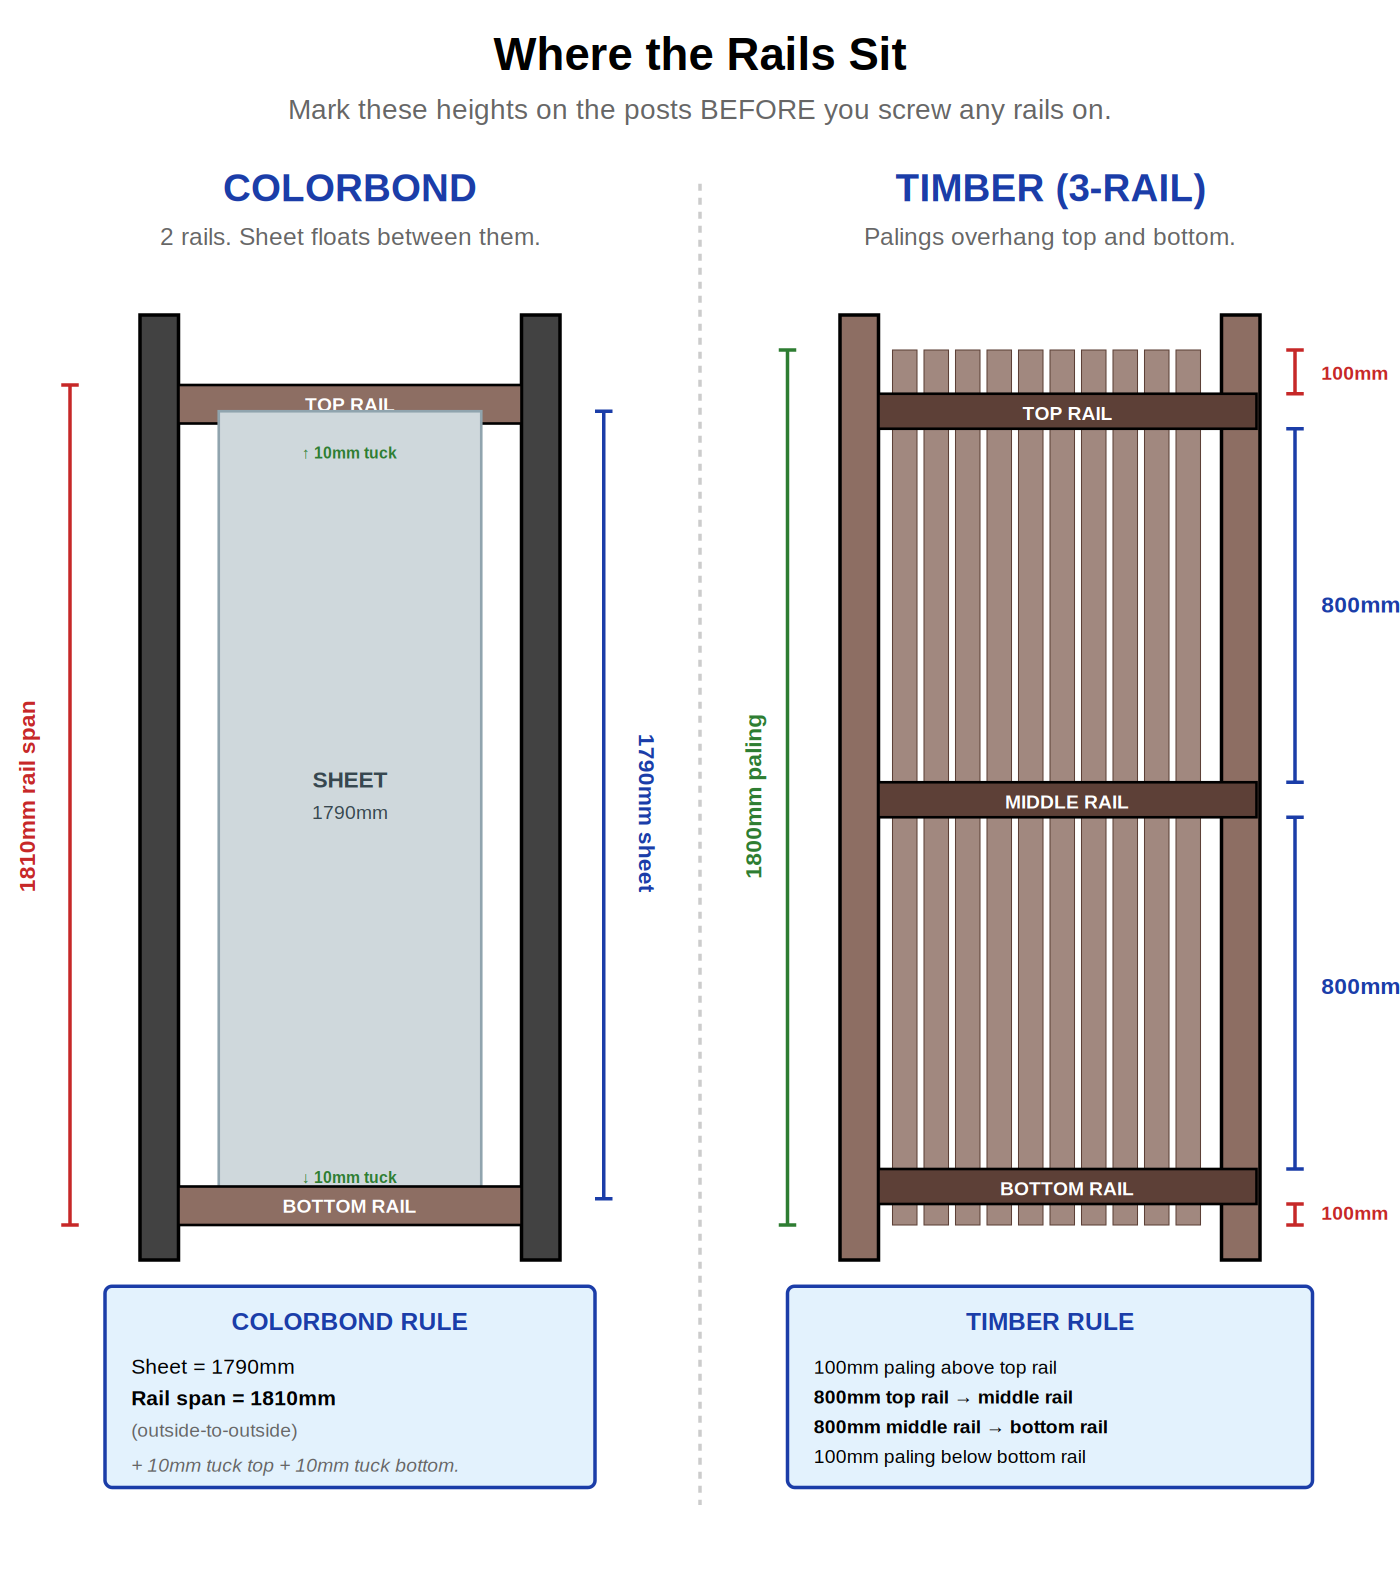
COLORBOND: Rail span from top of top rail to bottom of bottom rail.
For a 1.8m fence the span is 1810mm. For a 2.1m fence it's 2110mm. The manufacturer states the rail height for each profile. Use that.
Why 1810 (or 2110)? Sheet is 1790mm (or 2090mm). Rails are 40mm high. Sheet sits INSIDE the rail channels (top and bottom), with about 30mm of lap into each rail. That's 75% engagement, minimum. The 10mm at the back of each rail is the CLEARANCE, not the lap. If you only lap 10mm, the sheet falls out the bottom. Get the rail span right and the sheet sits deep in the channel where it should.
TIMBER (3-rail): 100 / 800 / 800 / 100mm spacing.
Standard paling sizes: 1800mm or 2100mm.
- Top rail: 100mm below paling top
- Middle rail: 800mm below top rail
- Bottom rail: 800mm below middle rail
- Paling overhangs bottom rail by 100mm
The 100mm overhang at top hides any rail screw holes and gives a clean top line. The 100mm overhang at bottom means no light gap, and the sleeper sits behind it. Two 800mm gaps between the 3 rails keep palings stiff against wind and kids leaning on them.
Make a template that matches the rail spacing. Use it on every post. Mark only the install side of the post, not all the way around. Faster, cleaner, no pencil marks visible from the other side.
Now the BIG one. LHS-only screws for Colorbond.
This is the trick most fencers don't know. Changes the whole install.
Start at one end post. Work towards the other. Don't start in the middle. Don't work both ends in.
Top rail follows the top string line. Bottom rail follows the bottom string line. Lay against the string. (Yes, we put both strings up between three posts a few lessons back. They're still there.)
COLORBOND: Screw the LHS only at every post. Leave RHS loose.
LHS = left when looking from your work side. Only the LEFT screw goes in at each post. Right side stays loose.
Why? We're about to slot sheets in. The loose right side of each rail lets us LIFT the RHS of the rail UP off the top of the post, slot the sheet into the rail channel, then drop the rail back DOWN onto the post. Always lifting UP from the top of the post, never down. If we screw both sides tight now, the sheets can't slot in. Don't worry. RHS screws go in AFTER everything is sheeted and eyed.
TIMBER: Both sides screwed. No hook trick needed.
Timber palings face-fix to the rails as you go. Different sheeting method (covered in next lesson). For timber, fully screw the rails on both sides now.
Cut post tops with a slight fall.
Whether it's timber or Colorbond, a slight fall on the post top stops water pooling. Doesn't have to be much, just enough that water runs off.
On a level fence, cut the post flush with the height of the top rail. On a raked fence, cut it at the higher side of the raking angle. Square cut still works for the cap to sit.
NEVER cut the post flat and dead level. Cap won't shed water. Water pools. Post rots from the top down.
Cold Cut Metal Saw for Colorbond on a rake. Cleanest cut, no paint burn, no rust. NEVER use a recip or a grinder. Both burn the paint and the rail rusts within months.
On a Colorbond fence, the rail span outside-to-outside should be:
- A) 1790mm (same as sheet height)
- B) 1810mm (sheet height + 20mm)
- C) 1850mm
- D) 1900mm
Reveal answer ↓
Answer: B
Rails are 20mm wider than the sheet (1790mm sheet, 1810mm rail span). Rails are 40mm high. Sheet sits INSIDE the rail channels with about 30mm of lap into each rail (75% engagement minimum). The 10mm at the back is clearance, not the lap depth. If sheet only laps 10mm, it falls out the bottom.
On a 3-rail timber fence with 1800mm palings, where does the middle rail sit?
- A) Halfway between top and bottom rails
- B) 800mm below the top rail
- C) 800mm above the bottom rail
- D) Both B and C. They're the same thing
Reveal answer ↓
Answer: D
B and C are the same answer. Spacing is 100 / 800 / 800 / 100mm. Middle rail sits 800mm below top rail AND 800mm above bottom rail. Both 800mm gaps. Two 800s keep the palings stiff.
On a Colorbond fence, you've put the top rails up. How many screws per rail per post?
- A) Two. Both sides fully screwed
- B) ONE. Left-hand side only. Right side stays loose for the hook trick.
- C) Four
- D) None. We'll screw them later
Reveal answer ↓
Answer: B
LHS-only at every post. Right-hand side stays loose. This lets us lift the RHS of the rail UP off the top of the post to slot sheets in (next lesson). Always UP from the top, never down. If we screw both sides tight now, sheets can't slot in. RHS screws go in AFTER everything is sheeted and eyed.
You need to cut a Colorbond rail on a rake. Which tool?
- A) Recip saw with metal blade
- B) Grinder with cutting disc
- C) Colt cut metal saw
- D) Hacksaw
Reveal answer ↓
Answer: C
Colt cut metal saw. Cleanest cut, no paint burn, no rust. Recip burns the paint. Grinder burns the paint AND throws sparks that damage the sheet. Both cause rust within months. Colt cut every time.
The LHS-only screwing trick changes how Colorbond fences are sheeted. Why do you think most fencers don't do this? What's the cost of fully screwing rails on both sides too early?
Sheets, Palings, Eye-It-Lock-It-Off, Gates
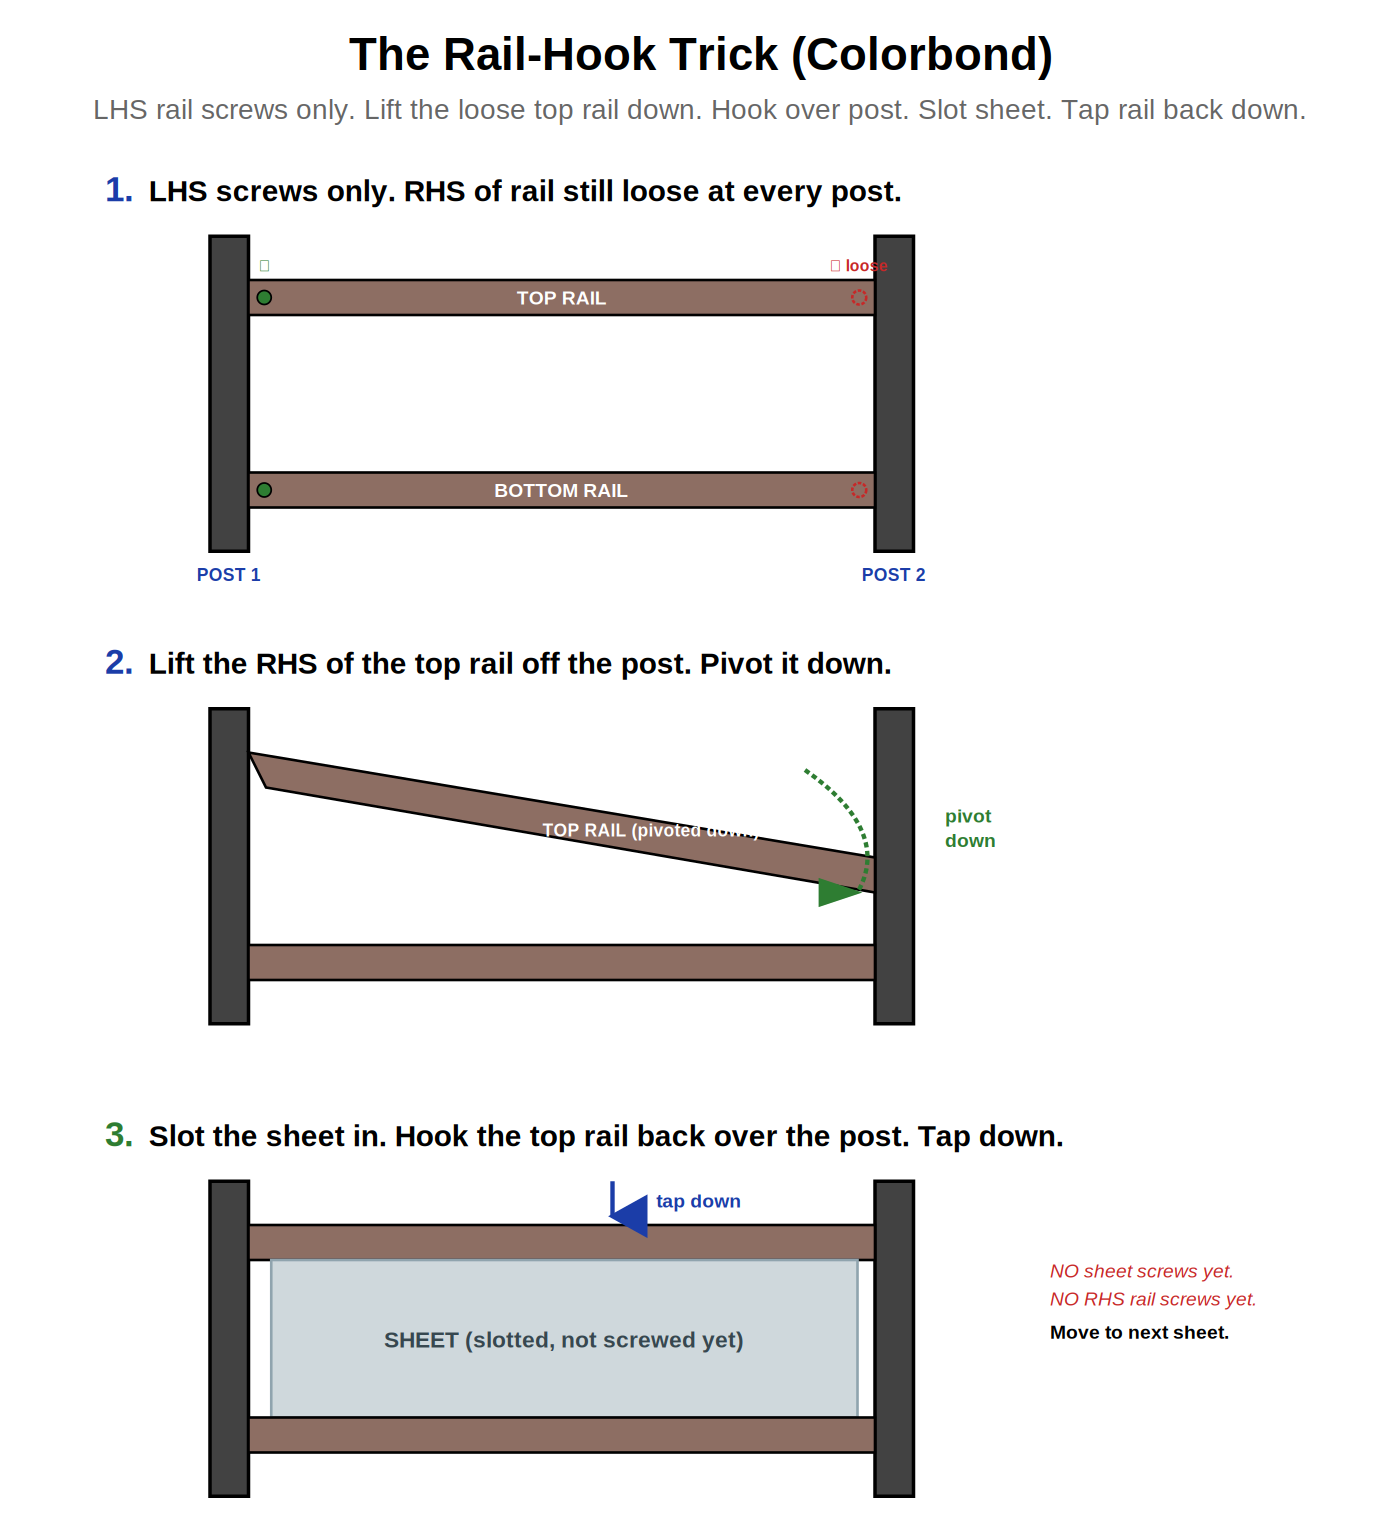
Colorbond Sheeting: The Hook Trick
Video not playing? Watch it on Vimeo →
Watch Tommy lift the rail UP off the C post (just enough), slot the sheet, tap the rail back down to the top of the C post. Never lower.
THE LESSON
This is where most fencers go wrong. They screw everything as they go. The 247 way is the opposite. Build it loose. Eye it. Then lock it.
COLORBOND SHEETS (with the hook trick)
Start at the LEFT end. Lap AGAINST the wind.
Work left to right along the run. Prevailing wind from the west? Lap each sheet so the wind hits the closed edge, not the open one.
Wind under an open lap edge lifts the sheet and rattles it. Lap with the wind direction so the wind pushes the sheet TIGHT to the next one.
Eye the first sheet plumb against the LHS end post. The C posts should already be plumb, so just eye it against the post. First sheet sets the run. Get this one looking right.
For sheet 2: lift the RHS of the top rail UP just enough for the sheet to slide in.
Lift only as much as you need. Slide sheet 2 in. Then tap the rail back down. Drop it onto one side of the C post. Don't let it drop lower than the top of the C post.
For sheet 3 and every sheet after: same step.
Lift the rail just enough. Slot the sheet. Tap the rail back down. Never lower than the top of the C post.
This is faster with two people. One handles the rail. One slots the sheet.
Tap the top rail down to seat the sheet. Rubber mallet or hand. Don't whack it with a hammer. Sheet sits tight in the channel with the rail pressing on top.
NO sheet screws yet. NO RHS rail screws yet. Move to the next sheet.
Why no screws yet? Because we want to eye the whole run before we lock anything off. Sheets don't slide once they're in the channels, but the rails can still be adjusted. Keep it flexible until eye-time.
Last sheet often needs a RIP cut. If the panel is shorter than the factory rail length, rip-cut the sheet to fit. Cut Colorbond sheets with the Cold Cut Metal Saw. Never a recip. Never a grinder.
One more rule. Keep timber with timber. Colorbond with Colorbond. Don't mix profiles in one panel. Looks wrong, doesn't seal right.
TIMBER PALINGS (different method, no hook trick)
String line for the paling tops, or use a paling template.
Two ways to set the top line. Either tie a string at the finished paling height for every paling top to kiss. Or use a paling template we sometimes make and butt the palings up to that. Onsite staff will show you which one we're using for this job.
On a raked timber fence, the top edge of the railing just kisses the string. Same trick, follows the rake.
Nail order: middles first, then plumb-check, then nail off.
Don't nail every paling fully as you go. The 247 way:
- Nail the MIDDLE rail only for each paling as you put it up.
- After every 6 to 9 palings, put the level on the edge and check plumb.
- If it's plumb, nail those 6 to 9 palings off properly. Top rail, middle rail, bottom rail. Two nails per rail per paling.
- If it's drifted, swivel the palings back to plumb (the middle-only nail lets them swivel), then nail off.
Why? Nailing only the middle first lets you swivel each paling back to plumb. Nail all 3 rails as you go and any drift is locked in. Customer ends up with a wonky fence line.
Timber Palings: Middle-Nail First
Video not playing? Watch it on Vimeo →
Watch the nail order in action. Middle rail only, every 6-9 palings level them, swivel any that drifted, then nail off properly. The trick that keeps the line dead plumb.
For the rails to palings: gun nailer is fine. For rails to posts: 100mm Type 17 batten screws.
Paling spacing depends on whether it's single-skin (butted) or double-skin.
- Single-skin butted: mark 150mm centres on the rails. Each paling goes on a centre line. Gap between palings ends up around 50mm.
- Double-skin: first skin same as above (150mm centres, 50mm gaps). Second skin marks at 25mm from the first skin's edge, butted to cover the gaps. NEVER lap palings, always butt them to each other.
If a paling needs cutting (raked tops, trimming): Flick a chalk line straight across the paling tops. Cut with a circular saw along the line. For the cleanest finish, use a TRACK SAW with a flicked guide line. Customer sees the top line. Worth the extra minute.
EYE IT. THEN LOCK IT OFF.
This is where everything gets fixed permanently. Walk before you lock.
Stand at the LEFT end. Eye the run. Look down the line. Are the sheet tops flush? Are the rails straight? Any sheet drifted out of plumb?
Walk to the RIGHT end. Eye the run back. Same check from the other direction. Different angle catches different problems.
Fix anything that's off. Sheet drifted? Slide it back. Rail not sitting flush? Tap it. Sheet at the wrong height? Lift and reseat. Now is the time.
Once you put screws in, you can't easily adjust without un-screwing and risking damaged holes. If you do end up with an old hole that's now in the wrong spot, put a screw in the hole anyway to seal it. Otherwise rust gets in. Eyeing twice from both ends catches what one walk misses.
Happy with the run? Screw the RHS of every rail. Now you can lock the RHS rail screws at every post. The rails are properly fixed.
Screw the sheets off. 5 screws per sheet per rail. Top rail, middle rail (if 3-rail), bottom rail. Don't over-tighten. Over-tightening Colorbond sheets pushes the screw head through the rib and rusts inside the sheet. Drives the customer mad in 6 months. Screw it snug. Stop.
GATES, CAPPING, FINISH
Pre-make the gate frame to suit the sheet or paling size. For Colorbond, build the frame to fit a sheet width. For timber, work to paling width. Example: 9 palings is almost 900mm. Plan for 10 to 15mm clearance each side to the post depending on which lock we're using. Doesn't matter if you pre-make or measure on site, just make sure the gaps work for the lock.
Hinge side first. Always. Hang the gate on the hinges before fitting the latch. Adjust hinges until the gate hangs square.
Drop bolt BEFORE the latch. Drop bolt goes in the ground first. Hammer a 100mm bit of PVC into the ground for the bolt to slot into. Drop bolt stops the gate swinging when the wind comes up. PVC sleeve stops the bolt rusting in the dirt. Customer will never know what we did but it'll work for 20 years.
Latch last. Adjust to close gently. Gate should swing closed under its own weight or with a light push. Latch should click without forcing.
Capping. Post tops. Saddles. Top cap goes on after sheets. Post caps after capping. Saddles on any cut post tops. Set every post cap with a dab of sealant. Wind will lift unfilled caps off within a year and the customer will ring asking where they went.
You're sheeting Colorbond left to right. Just slotted a sheet in. Should you screw it now?
- A) Yes. Screw it off so it doesn't move
- B) Just one screw to hold it
- C) NO sheet screws yet. NO RHS rail screws yet. Move to the next sheet.
- D) Top screw only
Reveal answer ↓
Answer: C
Build it loose. Eye it. Then lock it. Screws go in AFTER the whole run is up and eyed from both ends. Screwing as you go means you can't adjust sheets that drift. Loose = flexible. Tight = locked.
Prevailing wind comes from the west. Which way do you lap your Colorbond sheets?
- A) East to west, against the wind direction
- B) West to east, so wind hits the CLOSED edge
- C) Doesn't matter
- D) Both ways, alternating
Reveal answer ↓
Answer: B
Lap so the wind hits the closed edge, not the open one. Wind under an open lap edge lifts the sheet and rattles it. Lap WITH the wind direction = wind pushes the sheet tight against the next one. Quieter, stronger, lasts longer.
On a timber paling fence, what's the order for nailing palings so they stay plumb?
- A) Nail all 3 rails fully as you put each paling up
- B) Middle rail only first. Every 6 to 9 palings check plumb with a level. Then nail all 3 rails off together.
- C) Nail every second paling fully, fill the gaps later
- D) Just eyeball it
Reveal answer ↓
Answer: B
Middle rail only first. Lets each paling swivel back to plumb. After 6 to 9 palings, level them, then nail off properly (top, middle, bottom rail, two nails each). Nail all 3 rails as you go and any drift is locked in.
You're hanging a gate. What's the right order?
- A) Latch first, hinges second
- B) Hinges first, then drop bolt, then latch
- C) Latch and hinges together
- D) Drop bolt first, then hinges, then latch
Reveal answer ↓
Answer: B
Hinges first (gate hangs square). Drop bolt next (with PVC sleeve in the ground). Latch LAST (adjust until the gate closes gently). Order matters. Try the latch first and you'll be re-doing it after hanging the hinges anyway.
This is the 247 principle for the whole install finish.
- Rails LHS-screwed only. Sheets slotted. Nothing fully locked until eyed.
- Walk the run from both ends. Adjust anything off.
- Then screw RHS rails and sheets. Done right the first time.
Other crews screw everything as they go. Then they spot a drift, un-screw, adjust, re-screw, and end up with damaged screw holes. We avoid all that. Loose until eyed. Then locked.
The "Build it loose, eye it, then lock it" principle goes against the natural instinct to lock things as you go. Why is the loose approach actually faster overall?
📝 Chapter Quiz
What posts go in FIRST?
- A) Intermediate posts working from one end
- B) End posts
- C) The middle post
- D) Gate posts
Reveal answer ↓
Correct: B
End posts always first. They anchor the whole run. Once both end posts are set, you've got two solid points to run string lines between.
Standard hole depth for a 1.8m fence?
- A) 400mm
- B) 500mm
- C) 600mm
- D) 800mm
Reveal answer ↓
Correct: C
600mm deep, 200mm wide cylinder. Same depth for 1.2m through 1.8m fences. 2.1m and over jumps to 700mm minimum.
How much water per 20kg bag of rapid set?
- A) 500ml
- B) 2 litres
- C) 5 litres
- D) 10 litres
Reveal answer ↓
Correct: B
2 litres per 20kg bag. Pour slowly. Too much water = weak set. Too little = chalky and crumbly.
What does the bottom string line help you find?
- A) Where to dig the end posts
- B) Where the gate goes
- C) Transitions and sleeper zones
- D) The fence height
Reveal answer ↓
Correct: C
Walk the bottom string. Look for where ground steps up (paling shorter), drops away (sleeper zone), or hits the line (lift it 50mm). Mark every transition.
During caterpillar set-out, what's the gap between Rail 1 and where it leapfrogs to?
- A) Touching
- B) 5mm
- C) 10mm
- D) 20mm
Reveal answer ↓
Correct: C
10mm every time. That 10mm = the expansion gap that ends up in the finished fence. Two jobs at once. No measuring needed.
On a strip-out, new posts are landing on old post positions. What do you do?
- A) Dig through the old footings
- B) Use a 3100mm starting rail OR start from the other end
- C) Skip those posts
- D) Cut the old footings smaller
Reveal answer ↓
Correct: B
Three options to dodge. Start from opposite end (default), shift start by 700mm, or worst case use a 3100mm starting rail (for hidden surprises). New posts land in clean undisturbed ground.
How do you find where the middle post goes?
- A) Halfway between the end posts by tape measure
- B) Halfway along the bottom string line
- C) Lay all rails end-to-end with 10mm gaps. The centre of the caterpillar.
- D) Just eyeball it
Reveal answer ↓
Correct: C
Middle of the full caterpillar = middle of the run, by definition. Tape measures lie. Rails don't.
Bottom string is up between end posts but sagging 15mm in the middle. Where do you tie it off at the middle post?
- A) At the height it's sagging to
- B) 15mm above where it's sagging (lifted with your eye)
- C) Pull it tighter first
- D) Doesn't matter, rails will straighten it
Reveal answer ↓
Correct: B
Eye-trick. Pulling tighter doesn't remove sag. Gravity wins. Lift the string mentally to where it SHOULD sit if there was no sag. Tie off at THAT height. Fence stays dead straight.
Plumb intermediate posts in which direction?
- A) Both directions (left-right AND front-back)
- B) LEFT-RIGHT only. The string handles the line direction
- C) FRONT-BACK only
- D) Diagonally
Reveal answer ↓
Correct: B
Plumb LEFT-RIGHT only. String tells you in-line position. Level tells you left-right. Two jobs, two tools.
Ourtown Colorbond rail is 2370mm. Sleeper cut length?
- A) 2370mm
- B) 2390mm
- C) 2350mm
- D) 2400mm
Reveal answer ↓
Correct: C
Colorbond sleeper = rail length minus 20mm. 2370 - 20 = 2350mm. 10mm play either side so it drops in clean. Different rule for timber (post centre to centre).
On a raked fence, which side of the sleeper goes in FIRST?
- A) High side
- B) LOW side
- C) Whichever's easier
- D) Both at once
Reveal answer ↓
Correct: B
Low side in first. Then pivot the high side down. High side first = sleeper jams against the next post.
Colorbond rail span outside-to-outside?
- A) 1790mm (same as sheet)
- B) 1810mm (sheet + 20mm)
- C) 1850mm
- D) 1900mm
Reveal answer ↓
Correct: B
Sheet is 1790mm. Rails are 40mm high and span 1810mm outside-to-outside. Sheet sits INSIDE the rail channels with about 30mm lap into each rail (75% minimum). The 10mm at the back of each rail is clearance, not the lap depth.
On a Colorbond install, how do you screw the rails initially?
- A) Both sides fully screwed
- B) LHS only. RHS stays loose for the hook trick
- C) Top rail only
- D) Don't screw at all until sheets are in
Reveal answer ↓
Correct: B
LHS-only screws at every post. RHS stays loose. This lets us lift the RHS of the rail UP off the top of the post to slot sheets in. Always UP from the top, never down. RHS screws go in AFTER everything is sheeted and eyed.
You're sheeting Colorbond and just slotted a sheet under the hooked rail. Do you screw it now?
- A) Yes. Screw it off so it doesn't move
- B) Just one screw
- C) NO. No sheet screws yet. No RHS rail screws yet. Move to the next sheet.
- D) Top screw only
Reveal answer ↓
Correct: C
Build it loose. Eye it. Then lock it. Screws go in AFTER the whole run is eyed from both ends. Screwing as you go means you can't adjust drifts.
Right tool for cutting Colorbond on a rake?
- A) Recip saw
- B) Grinder
- C) Colt cut metal saw
- D) Hacksaw
Reveal answer ↓
Correct: C
Colt cut. Cleanest cut, no paint burn, no rust. Recip and grinder both burn the paint and cause rust within months.
The install is done right. Now we close the day properly.
Read it. Use it. Get better.